Git is a wonderful tool that can multiply your project’s impact, or make your project easier to manage by an order of magnitude. Some of us hackers don’t yet know how to use command-line Git, but a relatable example of why a certain tool would be useful might be a good start. Today, I’d like to give you a Git crash course – showing you why and how to put a KiCad PCB into a Git repository, later to be shared with the world.
KiCad works wonderfully with Git. The schematic and PCB files of KiCad are human-readable, especially when compared to other PCB file formats. KiCad creates different files for different purposes, each of them with a well-defined role, and you can make sense of every file in your project folder. What’s more, you can even modify KiCad files in a text editor! This is exactly the kind of use case that Git fits like a glove.
Not Just For Software Developers
What’s Git about, then? Fundamentally, Git is a tool that helps you keep track of code changes in a project, and share these changes with each other. Intended for Linux kernel development as its first target, this is what it’s been designed for, but it’s flexibility extends far beyond software projects. We hardware hackers can make use of it in a variety of ways – we can store PCB and other design software files, blog articles, project documentation, personal notes, configuration files and whatever else that even vaguely fits the Git modus operandi.
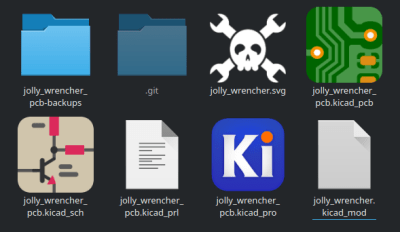
The first benefit you will get from using Git is a backup of your project. In fact, if you upload your git changes somewhere, you get two extra copies of your project – one stored in your local .git folder, and one uploaded to a place like GitHub or GitLab. In fact, a project stored in Git with an online mirror conforms to the 3-2-1 backup principle automatically. What’s more – you get historical backups within arm’s reach. Have you redesigned your PCB long ago, and now urgently need to refer to an earlier version? As long as you’ve been keeping your changes in Git, they’re a single command away.
Many people also store configuration files in Git – you might’ve heard of this practice being referred to as dotfiles. Doing that helps you keep track of all configuration changes you make. If you’ve ever debugged a complex piece of software (say, a webserver) by recombining parameters in its configuration file, you’ll know how painful it can be when you forget a change that used to work – and losing a meticulously tailored configuration file is pain on a whole different level. With a few Git commands under your belt, you avoid a world of pain you might’ve never known you could avoid.
Often, we hackers need each other’s help – and for such cases, Git’s collaboration capabilities are second to none. Say, you find yourself working on a PCB project with a fellow hacker across the globe. With Git, you only need one command to upload your latest changes, and your colleague needs one command to download them. If you both have made changes in a way that they conflict (say, edited the same footprint in a different way), Git has a rich toolkit for changeset conflict resolution, freeing up precious time you both could instead spend arguing about high-level design problem.
Hacker, Meet Git – Git, Meet Hacker
For a start – you have a PCB project, and you’ve installed a Git shell on your OS of choice. I also assume you know your terminal’s basics – moving from directory to directory and opening files, we won’t need much more. Git needs a few small variables configured before you can start – let’s get that sorted out, and use that as an opportunity to test that git functions in your console of choice, too.
For tracking your changes, Git wants to know your name and email – these don’t have to be real. If you push your changes to GitHub/GitLab/etc, both the name and the email are going to be accessible to anyone who can download the repository contents from where you uploaded them, which is to say, usually anyone. I use my nickname and my old public-facing email address for that, for collaboration and “contact me about this project” purposes – you can do the same, or just use the John Doe defaults if you’ll never upload. Here are the commands you should run, taken from here:
git config --global user.name "John Doe"

git config --global user.email johndoe@example.com
Being --global, these changes only need to be done once on each machine you use for Git work. In addition to these two, it helps to let Git know which text editor you prefer for making quick changes – those will be called for every so often. On Linux, you might find that your default editor for git commit is already set to Vi – if you don’t know what :wq! stands for, feel free to run run git config --global core.editor nano for a more friendly option. On Windows, you’ll want to do things a bit differently.
Now, you’re all set to start. In your terminal, move to the folder where your PCB project is stored. Type git init and press Enter. That’s it – your project folder is now a Git repository!
Adding Your Changes
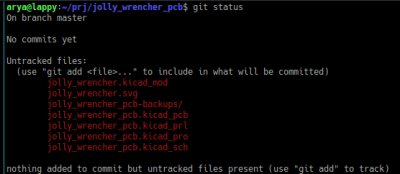 From here, Git doesn’t yet keep track of your project files. Run
 git status, and see a bunch of files marked as “untracked”. git status helpfully tells you what to do to start tracking them – in fact, this command does a fair bit of handholding for Git newcomers, as you can see from the output. Let’s add the files we care about – that is, everything but the .kicad_prl file and the -backups/ directory!
$ git add jolly_wrencher.svg
$ git add jolly_wrencher.kicad_mod
$ git add jolly_wrencher_pcb.kicad_pro
$ git add jolly_wrencher_pcb.kicad_pcb
$ git add jolly_wrencher_pcb.kicad_sch
$ git status
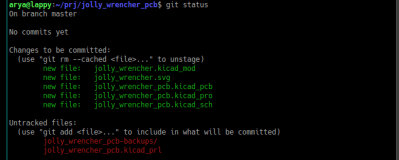 These files have been added to the list that Git is watching, but they’re not yet worked into the project’s Git history in a way that matters. For that, we need to make a commit, which registers a group of file changes. Starting a repository like this, you’ll usually do an “initial” commit – for that, you can run
 git commit -m "Initial commit", where the -m parameter is a human-readable message describing what the changes mean. You can also do git commit and write the message in a separate editor – see what’s more comfortable for you. Since the files weren’t previously committed, they will be stored in their entirety.
A Bit Of Commit-ment
A commit is a “unit of work” of sorts, a way to group changes logically. You can navigate between commits in your project’s history as different stages of your project’s development, separate some commit-contained tweaks into a different branch so that you can have multiple different versions of your project coexisting seamlessly, transfer commits between repositories, export and email them, and so much more.
It makes sense to hold logically distinct changes in different commits. Say, you improve silkscreen on your PCB, and you also add a license file. First, you add your .kicad_pcb file and commit it with “silkscreen: added pinouts” message; then, you add your LICENSE.txt file and commit it as “added license”. This helps you overview your project’s history, track mistakes down, and a myriad of other things.
If you run git log, you will see the list of commits. Using their hash, you can move between commits when you need an older version of your project. For that, do git checkout HASHCHARS, where “HASHCHARS” is at least seven first characters (can be more!) of your commit hash. To get back to your project’s latest state, do git checkout HEAD.
Don’t Need To Track Everything
git status still shows us the .kicad_prl and the backup directory that we don’t need to track – these two don’t contain meaningful changes. For ignoring these two kinds of files, create a .gitignore file (name starting with a dot) in your project’s main directory, and put these two entries in it:
*.kicad_prl
*-backups/
As you can see, you can do some very simple pattern matching there, but you could also put the actual project file names – I didn’t want to type them out, and the more generic version will be handy if you want to copy-paste. git status will already cease showing these files, and as you add and commit the .gitignore file, these two entries will stay. Want a KiCad-specific gitignore file that covers most cases you’ll encounter? GitHub offers one.
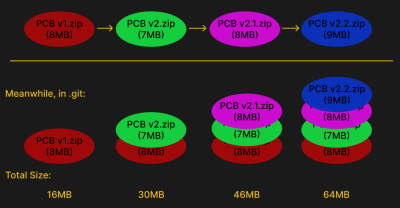
Git doesn’t understand binary files – it’s designed for human-readable text files that change in a meaningful way. KiCad PCB files fit that criteria – a whole lot of other files do not. Thing is, each version of a binary file will indefinitely remain as a copy inside your .git folder, staying long after you’ll have updated the binary file with a new version. You don’t want to store a .zip that changes frequently in your project’s git repository, and you don’t want to store gerber files there, either. It just takes up extra space and time.
Extra Features At No Cost
The versioning capabilities of git come handy in PCB development, and there’s plenty of niceties that make it even more comfortable to use. For instance, if you want to move between project versions quicker, you can attach tags to commits. Did you develop a v2 of your PCB, but still need to refer to v1 files for customer support reasons? Do git tag v2 to tag the current commit as “v2”, and do git tag commit v1 HASHCHARS pointing to a commit where your PCB was still at v1. Now, you can do git checkout v1 and git checkout v2 to jump between versions as needed.
Let’s say, hypothetically, you’ve committed a README.md file – a good practice (feel free to use my PCB README template!). Let’s also say, for the sake of the argument, that you’ve just added some images into your project directory and linked them into the README. Say, you’ve also edited the README to add some completely unrelated changes that belong in a separate commit – perhaps, you’ve changed a connector on the PCB and reflected that in README. How do you separate logically different changes that you’ve just made to the same file? Use git add --patch README.md to interactively pick and choose which parts of the file get added.
Committed something and want to tweak the last commit’s message? Use git commit --amend. Need to add/remove/tweak files in the last commit? Add your changes and commit --amend. Did some changes to a file and want to get rid of them instead of adding? Use git checkout path/to/file – you’ll lose these changes as the file will revert to its currently tracked version. Oh, you can also use --patch with git checkout for partial reverting of changes.
Git has helpful subcommands aplenty. If you want to see current changes to your project files in console, use git diff. Did you add some of the changes already and they won’t show up? Use git diff --cached. Both of these commands accept filenames for more targeted overview. There’s a lot of complexity Git is capable of, being a tool viable for the largest distributed software development efforts. You actually don’t need to use any of the fancy features if you don’t want to, either.
Next Step: Upload
As you can see, I haven’t covered uploading to an online repository or working with others; these are topics with quite a few important caveats. I’d also like to cover GitLab as well as GitHub, so that you’re not locked into a single ecosystem. I haven’t covered branches, either – a typical PCB project doesn’t need that, but we might talk about that in a future installment. Still, you can learn that as you go. You’re now equipped to use Git for simple projects!
Git Intro For Hardware Hackers
Source: Manila Flash Report
0 Comments