

In the first article, I’ve given you an overview of Lithium-Ion batteries and cells as building blocks for our projects, and described how hackers should treat their Lithium-Ion cells. But what if you don’t have any LiIon cells yet? Where do you get LiIon cells for your project?
Taking laptop batteries apart, whether the regular 18650 or the modern pouch cell-based ones, remains a good avenue – many hackers take this road and the topic is extensively covered by a number of people. However, a 18650 cell might not fit your project size-wise, and thin batteries haven’t quite flooded the market yet. Let’s see what your options are beyond laptops.
Smartphone Batteries A Viable Source
First underappreciated source of LiIon cells, specifically pouch cells, are smartphone batteries. Of course, we’ve all seen a phone battery die earlier than the phone did, and in many modern phones, the cell is glued-in and harder to extract. However, shopping for smartphone batteries in your local stores is still worthwhile if you need a small cell to power your device.
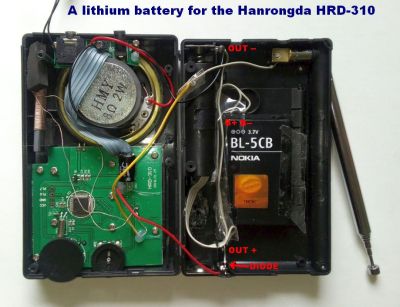
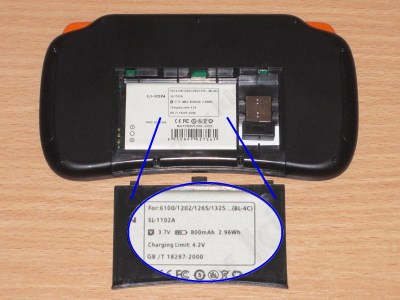
For instance, user-replaceable batteries are still manufactured and sold for numpad phones from manufacturers like Nokia, with cells typically around 1000 mAh, more than enough for a small ESP32 or Pi Pico project that spends lots of time asleep. If you’d like to make your device repeatable by others and make battery sourcing simple, perhaps work around LiIon shipping restrictions, or if you’re a garage startup itching to get a small prototype batch out of the door, smartphone batteries are a good bet.
Even more, there’s not much preventing you from putting the same contacts used by phones onto your PCB. You can source these contacts from online repair shops, LCSC, Aliexpress and probably more. With a smartphone cell, you get a protection circuit, usually a built-in thermistor and often a one-wire or I2C fuel gauge. Most importantly, you get a battery with an active supply chain, which means you can design it into your project mechanically and electrically, and not fear a redesign a few months in when all local stock of a very specific cell suddenly runs out. One small thing to keep in mind – while older Nokia batteries have a third pin, it’s not a thermistor pin – instead, it’s a fixed-value cell identification resistor.
 We’ve seen this done with iPhone batteries, and we’ve also seen things like makeshift pin header-based holders for smartphone cells. I first encountered it when I saw pictures of a Chinese radio using Nokia format batteries, and I’ve been designing them into small-scale stuff ever since. You don’t have to look for “genuine” cells, third-party cells with good reviews are a decent source and tend to provide more value per dollar, but bottom-of-the-barrel cells are likely to disappoint.
Vaping has helped make LiIon cells a bit more accessible. First off, disposable vapes provide us with small cells that are nicely reusable – remember to use protection. However, vape shops are also a decent source of high-current-capable 18650 cells, and if you’re a hobbyist designing a device with an 18650 holder in it, you don’t have to worry about battery shipping restrictions unfairly impacting small-scale producers when you can ask your recipient to go to a vape shop and buy a 18650 for a modest markup.
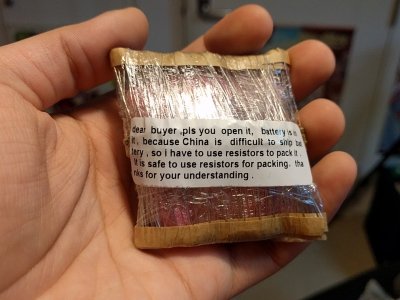 There are also specialized stores that sell LiIon cells and batteries, 18650 and pouch alike, with good prices and inexpensive ground shipping. Quad and other remote-controlled vehicles eat them up, so a shop like Hobby King often has good deals. In Europe, Nkon is one of the go-tos, and I’ve had great success getting 3.5 Ah cells from there with prices comparable to Aliexpress fake “6.5 Ah cell” listings. Speaking of that, I can’t say I recommend Aliexpress – to this day, they seem to need to resort for tricks when airmailing you cells, which sometimes still get randomly seized by customs screening, and cells of subpar quality have a non-negligible market share there.
Mind The Mechanics
Once you got hold of some cells, how do you connect them into your circuit? If they’re 18650s, it’s good to have a holder – Thingiverse has no shortage of printable ones, and commercially made holders tend to be less frustrating to use. Leaf contact holders are better than spring-based ones when it comes to higher-current applications; otherwise, you might never notice a difference. In a pinch, if you have four disk magnets, you can clamp two wires between two magnet and snap them onto your 18650s for a holder – I’ve done that for a hackathon once, when we badly needed to power a Raspberry Pi 3 inside a wearable device and there was no a suitable powerbank around.
With a pouch cell, if it has wires that terminate in a plug, it’s good to have a receptacle for it – desolder it from the original device if needed. Otherwise, you can fashion a plug out of pin headers, even if it’s going to be non-polarized – you’ll want to add your own polarity mechanism, i.e. color-coding. Remember, female header on the power source, male header on the power input – shorting the battery is worse than shorting a non-connected power input by accident.
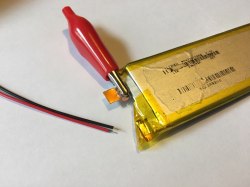 If your pouch cell doesn’t have a connector and just has tabs, you’ll want to solder to those tabs – but a good practice is that you clamp a crocodile clip between the solder point and the battery before soldering, for heatsinking purposes. These tabs are wired up directly to the polymer layers inside the cell, and overheating that might shorten the battery life.
You’ll also want to make sure that pouch cells are not at risk of being punctured or squished, and that this doesn’t happen if the cell starts to puff up, either. This means not gluing it to the bottom of your board if you also have through-hole pins sticking out on that side, for a start. Having a 3D-printed holder with at least one wall being bendy and thin (if not open) will be helpful – and make sure that the cell doesn’t end up being stuck inside this holder in the not-unlikely case that it decides to puff up. Smartphone batteries of the swappable kind tend to be a bit sturdier, but you still would benefit from extra mechanical protection.
Standardized Connector, But Not Quite
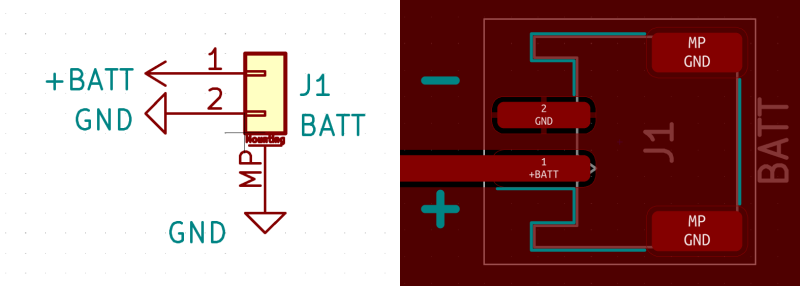
A good connector for LiIon pouch cells is a two-pin JST-PH – it’s the one you will see most often on random boards out in the wild, and therefore the one that it makes sense you stock up on connectors and cables for. When it comes to the PCB side connectors, you should get the SMD version, JST part number being S2B-PH-SM4-TB and alternatives searchable using “1x2P PH 2mm”. Sadly, the through-hole version of this connector is flimsy, lacking shell mounting pins – the metal pins break off relatively quickly, whereas the SMD version is quite sturdy and stays on the board.
As you get into the groove of adding battery power to your projects, it will help a lot if you stock up on some JST-PH leads in advance, from places like Adafruit, Aliexpress or other stores – I got a 50-pack from the Lilygo store. Crimping your own, while technically possible, might result in wires that pull out of the crimp easily, which is a giant pain and tends to happen at the most inopportune moment. We’ve covered the subject of crimping extensively; the gist is, if you don’t have access to a proper crimping tool, it’s way better to buy a bouquet of pre-crimped wires. When unplugging a JST-PH connector, it’s best to grab it by its wings with flush cutters or tin snips.
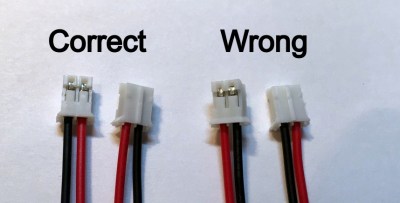 Careful – even though JST-PH connectors are used on boards from a large variety of different hobbyist manufacturers, there are two different pinouts for JST-PH 2-pin battery plugs. Places like Adafruit, Sparkfun, HobbyKing and others use a pinout where the positive (red) is pin 1 and negative (black) is pin 2, whereas many Chinese sellers have it the other way around – negative being pin 1 and positive being pin 2. This divide, thankfully, doesn’t extend to microcontroller boards – Wemos and Lolin boards seem to use the same pinout as Adafruit and Sparkfun.
Plugging a battery in reverse is basically guaranteed to kill your board – to be exact, at least its power management components. With JST-PH 2-pin, this means you should always check your pinouts. If you design your own board, you should place pinout markings on the silkscreen next to the connector – a practice that more PCB designers ought to adhere to when they add JST-PH battery connectors to their boards. Thankfully, you can easily rewire JST-PH plugs to whichever standard you desire to stick with – and take care not to short-circuit the cell as you pull its contacts out of their shell while rewiring the plug.
Taking Flight
If you carry a battery-powered DIY device, going to an airport might sound intimidating, yet it’s more viable than it might sound – if you want to take your device with you as you embark on a flight, you can. Keep in mind – LiIon cells and devices with LiIon batteries in them have to be in your carry-on, and they’ll have to go through the security scanners just like your laptop and phone. Making your device more presentable to some extent will help, and keeping the batteries separate from the device is a great idea if you want your airport security queue experience to be seamless. Again, both pouch cells and 18650s are best stored in some kind of hard case when transporting them. With a bit of presentability and precautions combined, your creations can travel with you.
Next time, let’s talk about the electronics nitty-gritty – charging cells in 1s configuration, converting LiIon voltage to more friendly 3.3 V, protection and power paths, with ready-to-use examples you can put on your boards.
Lithium-Ion Batteries Are Easy To Find
Source: Manila Flash Report


0 Comments